So, if you are someone who is facing issues with File Explorer in Windows 11, we have got you covered! In this article, we are going to provide a few easy fixes for the File Explorer not working issue in Windows 11. Read the article till the end to know every possible troubleshooting ways that you can use to get File Explorer up and running on your Windows 11 device again.
Fix File Explorer Not Working in Windows 11
Now, there can be a plethora of reasons why the File Explorer application is not working on your Windows 11 device. The issues might include corrupted system files, existing viruses or malware in your system, or minor issues in the Windows Explorer process on your PC. Below, you will find some of the best fixes for the File Explorer not responding issue in Windows 11. Be sure to try out the fixes one by one and adhere to the steps mentioned below as best you can. With that out of the way, let’s get into the fixes, shall we?
1. Restart Windows Explorer in Windows 11
Now, the first thing you should try when File Explorer stops working or responding on your Windows 11 device is to restart the application and the Windows Explorer background process from the Task Manager. So, to restart the Windows Explorer application in Task Manager, follow the steps right below.
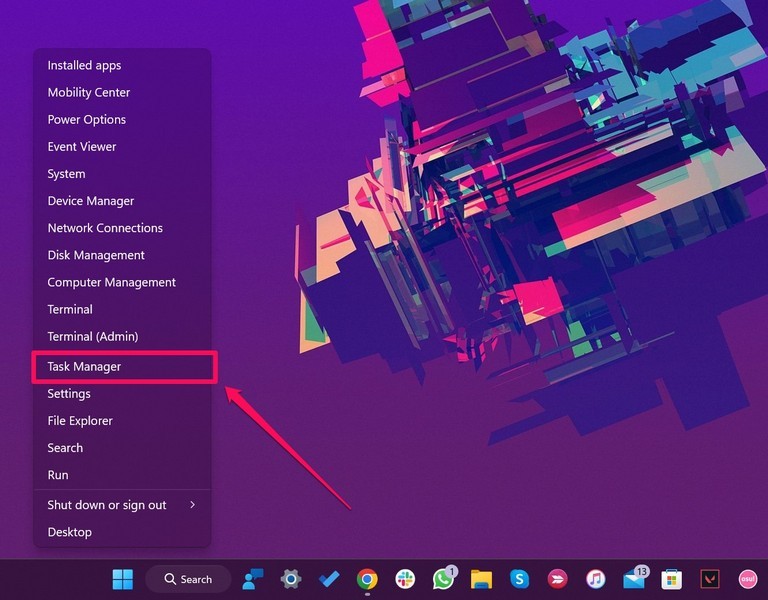
- Right-click the Start icon on the Taskbar and click the Task Manager option on the Quick Links menu.
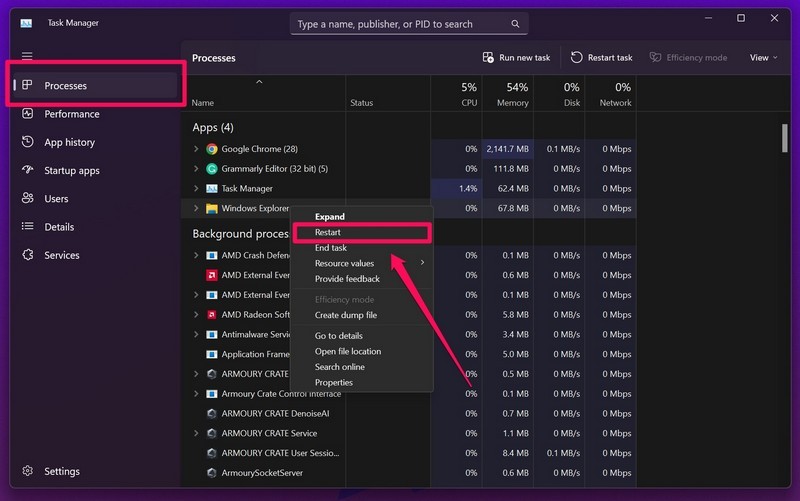
- In the Task Manager window, select the Processes tab from the side-nav bar.
- Right-click on the Windows Explorer application and click the Restart option on the context menu. Now, if you do not see the Windows Explorer app under the Apps section in Task Manager even with File Explorer opened, it might mean that there is an issue with the Windows Explorer background process. Hence, you can restart the Windows Explorer background process to try and fix it. Follow the steps right below to restart the Windows Explorer background process in Windows 11.
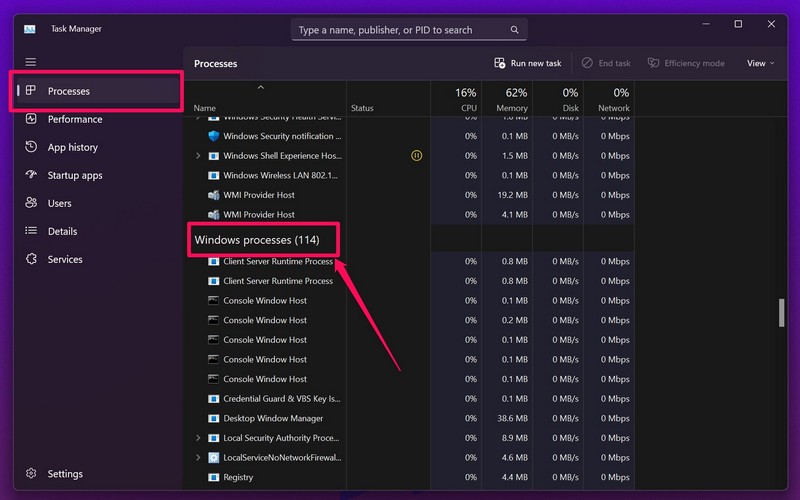
- Under the Processes tab in Task Manager, scroll down to the Windows processes section.
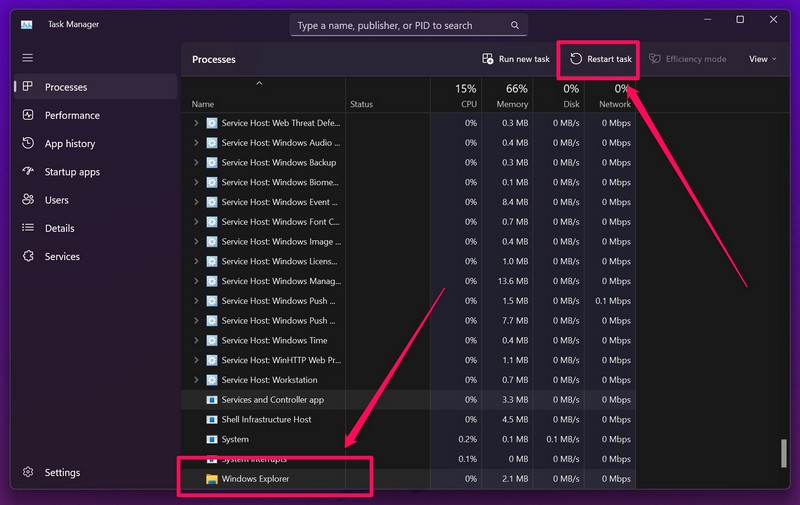
- Find the Windows Explorer background process on this list and click on it to select.
- Now, with Windows Explorer selected, click the Restart task button at the top (screenshot below) to restart the background process. Following the restart, try opening the File Explorer application on your Windows 11 device. It should work fine now.
2. Clear File Explorer Cache in Windows 11
Now, if the above method did work for you and the File Explorer starts working on your device, as usual, it is well and good. However, if you feel that the application is running a bit slower than it used to on your device, what you can do is try clearing the cache in File Explorer. Clearing the File Explorer cache helps improve the performance of the application in Windows 11 and might resolve the slowness that you are facing. So, to clear the cache in File Explorer in Windows 11, follow the steps right below.
- Open the File Explorer app on your Windows 11 device.
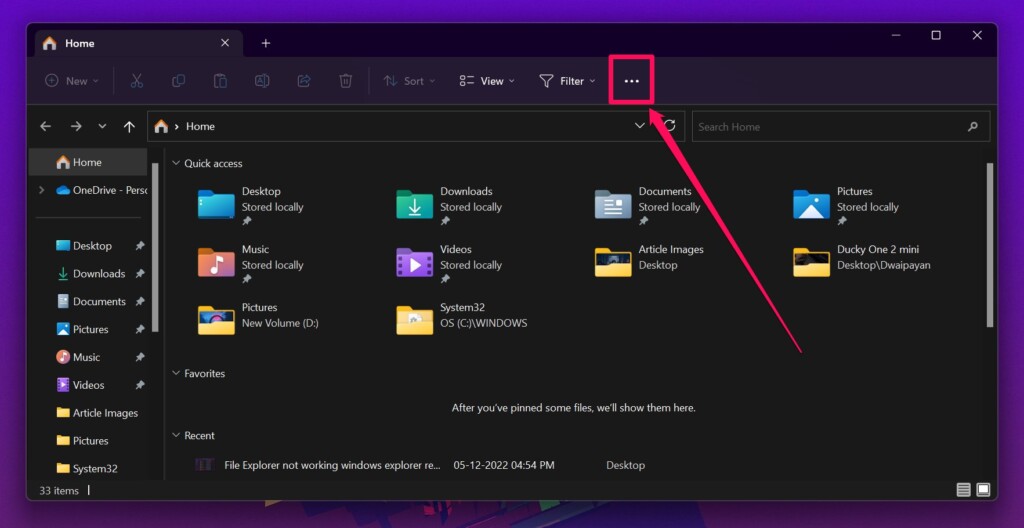
- Click the three-dot button at the top.
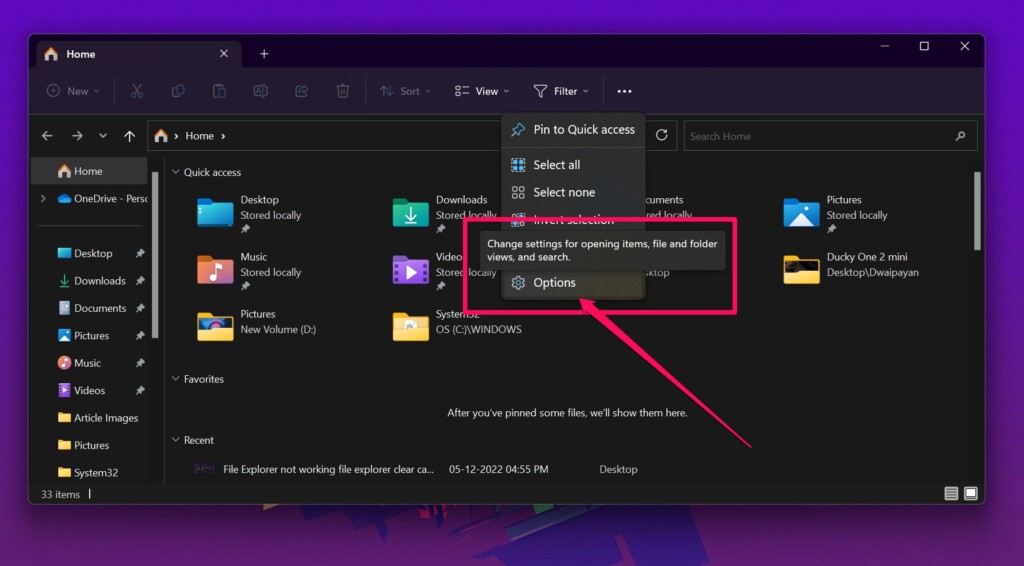
- Select Options.
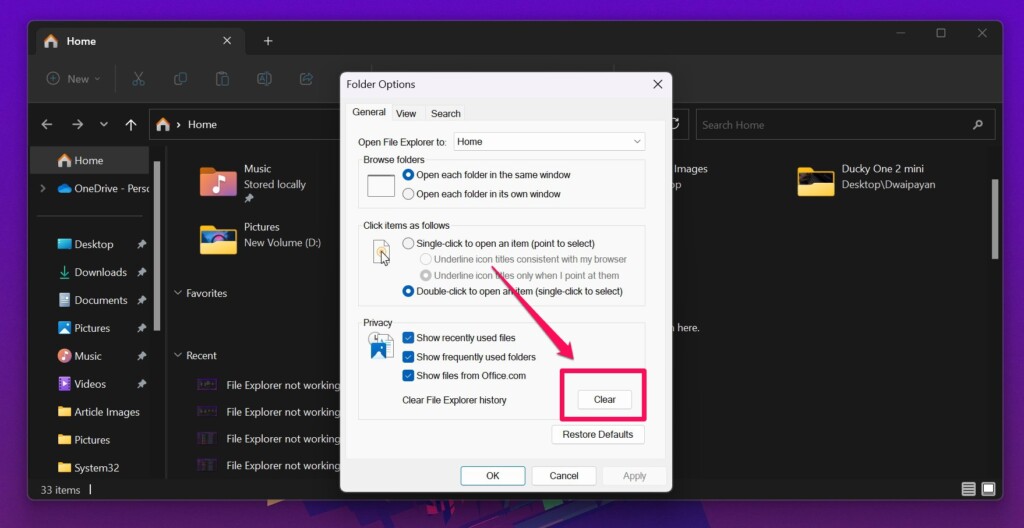
- In the following Folder Options window that opens, Click the Clear button beside the Clear File Explorer history, under the Privacy section. After clearing the cache and deleting all the temporary files relating to File Explorer in Windows 11, the application should return to its usual level of performance on your device.
3. Use System Maintenance in Windows 11
If the above methods could not resolve the issues in File Explorer in Windows 11, you can try the System Maintenance tool that is built right into Windows 11. The System Maintenance tool is a nifty Windows feature that scans your PC or laptop for some of the common yet tricky issues and resolves them automatically. Hence, when File Explorer stops responding in Windows 11, a quick System Maintenance scan could easily solve the issue. Follow the steps below to use it on your PC or laptop right away and get File Explorer up and running again.
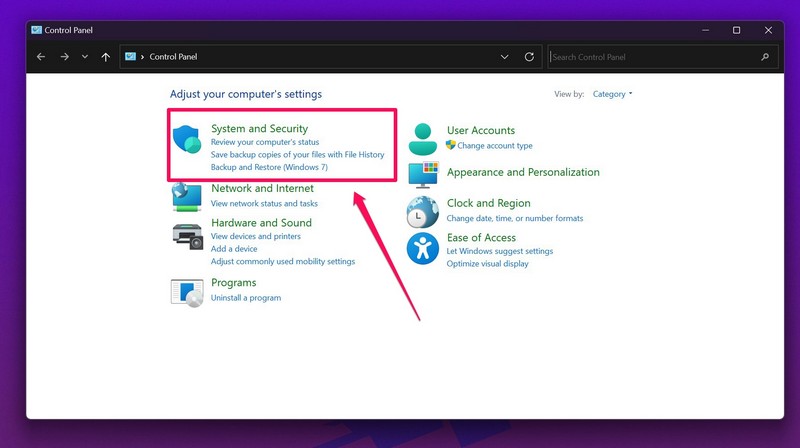
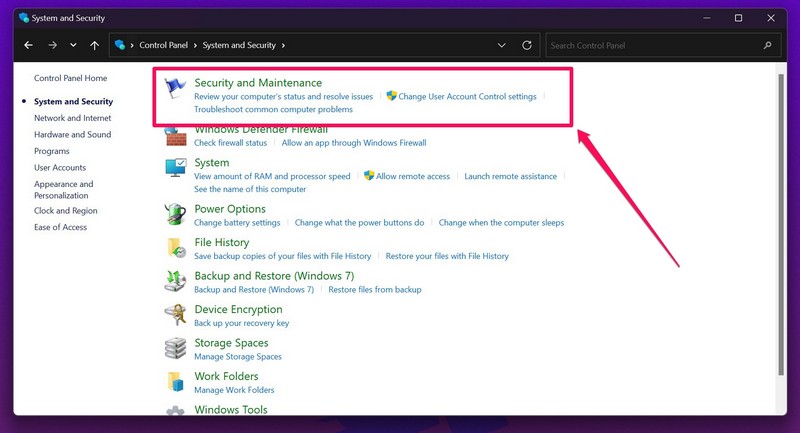
- Open Control Panel on your Windows 11 device and click the System and Security settings at the top.
- Then, click the Security and Maintenance settings.
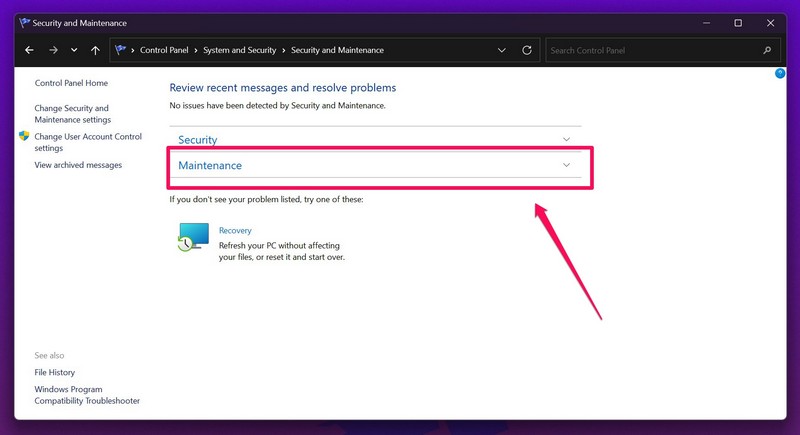
- Click the Maintenance option to expand it.
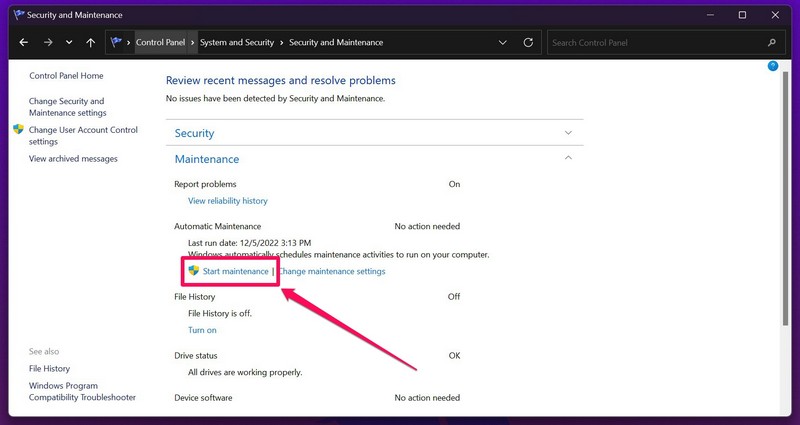
- Now, click the Start Maintenance button. You will see a “Maintenance in progress” sign show up.
- Wait for the process to complete. Try opening File Explorer after the completion of the maintenance process. The program should work just fine now.
4. Run SFC Scan in Windows 11
If you are still stuck with a non-responding File Explorer in Windows 11, it is high time you run an SFC scan on your device. The System File Checker (SFC) scan is a Windows command-line tool that scans your system for missing or corrupted system files and automatically replaces them, if need be, to fix system-level issues. Hence, there is a very high chance that a quick SFC can resolve the issues in File Explorer in Windows 11. To run an SFC scan on your Windows 11 device, follow the steps right below:
- Click the Search icon/ bar on the Windows Taskbar and search for “cmd“
- Click the Run as administrator button for the Command Prompt application.
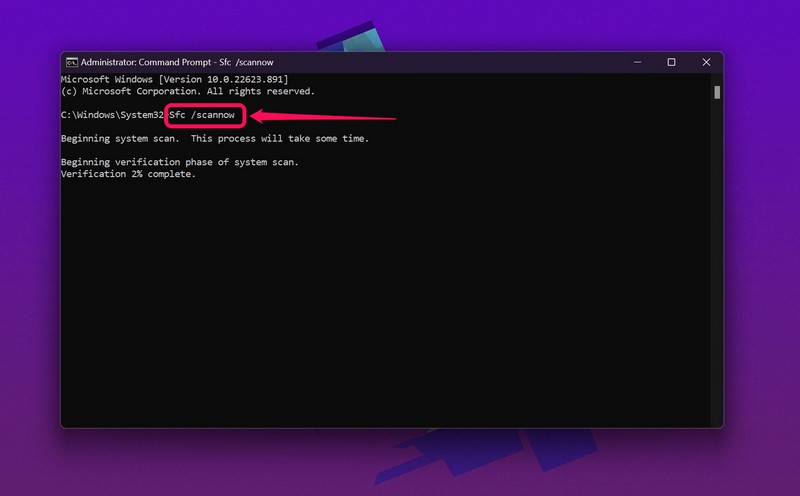
- Now, type in or copy-paste the following command in the Command Prompt tool and press Enter:
- Wait for the scan to complete. Following the SFC scan completion, it is best to restart your PC or laptop before checking whether File Explorer is working on your Windows 11 device or not.
5. Run DISM Scans in Windows 11
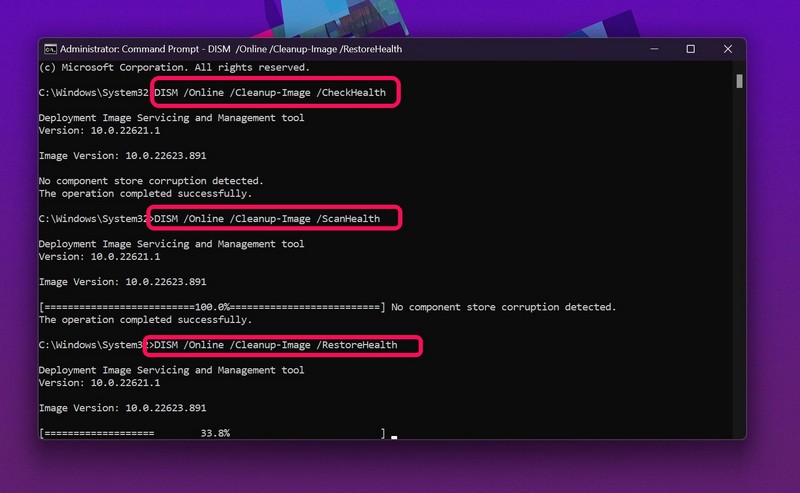
If the SFC scan fails to resolve the issues in File Explorer, you can try the next best thing and that is DISM scans in Windows 11. The Deployment Image Servicing and Management (DISM) scans is a set of command-line tools to detect and resolve issues in the system images. Hence, running these scans can immediately resolve the issues in File Explorer and make it operational again. To run the DISM scans in Windows 11, follow the steps right below.
- Open the Command Prompt tool by running it as administrator in Windows 11.
- Now, type in the following commands and press Enter one by one: Note: Make sure to run these command-line tools one after the other and not simultaneously.
- Wait for the scans to complete and restart your PC or laptop. Following the restart, try opening File Explorer in Windows 11. It should start working on your device without any issues.
6. Use Windows Security to Check for Viruses/ Malware
Now, as aforementioned, viruses and malware can cause various system-level issues in your Windows 11 environment that can prevent the basic programs from running properly on your device. Hence, if the above methods did not fix the issues in File Explorer in Windows 11, chances are your PC or laptop is affected by a virus or a malware program. In this case, you can use the Windows Security tool to scan your entire PC or laptop to find the threat file or folder that might be preventing the File Explorer app to run properly on your device. For that, use the steps right below.
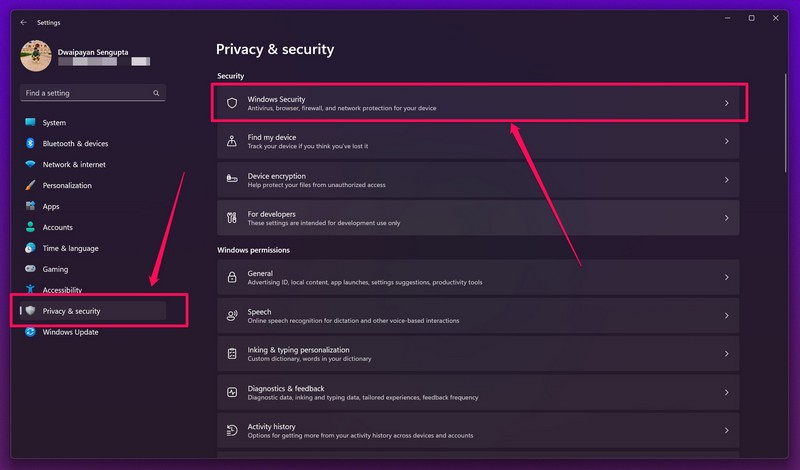
- Open the Settings application on your Windows 11 device with the Windows + I shortcut or by simply searching for it.
- Go to the Privacy and security tab from the left pane and click the Windows Security option at the top.
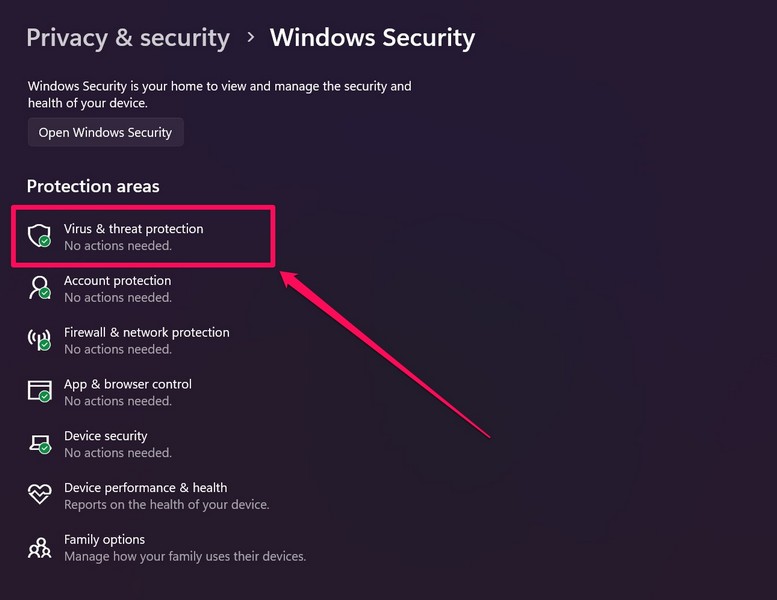
- Then, select the Virus & threat protection tool.
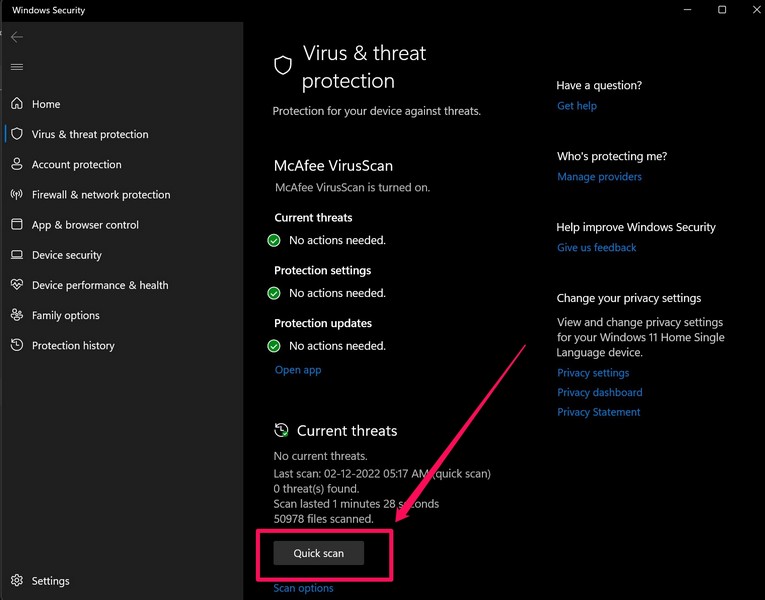
- Now, click the Quick Scan button at the bottom. Wait for the scan to complete and find the virus or malware program that might be causing File Explorer issues in Windows 11. You might have to delete third-party programs that you have previously downloaded from the internet if the Windows Security tool advises you to do so. Once the tool shows the “No actions needed” sign for the Virus & threat protection option, the File Explorer app should be fixed in Windows 11.
7. Check for Windows Updates
Another common reason for the File Explorer app not working in Windows 11 issue can be outdated Windows versions. Whether your File Explorer is working or not, it is best to keep the Windows 11 OS on your device up to date to avoid these kinds of system issues. Hence, if you feel that File Explorer is not working or responding on your Windows 11 device, check for Windows updates for your PC or laptop. To do this, follow the steps right below.
- Open the Settings app on your Windows 11 device with the Windows + I shortcut.
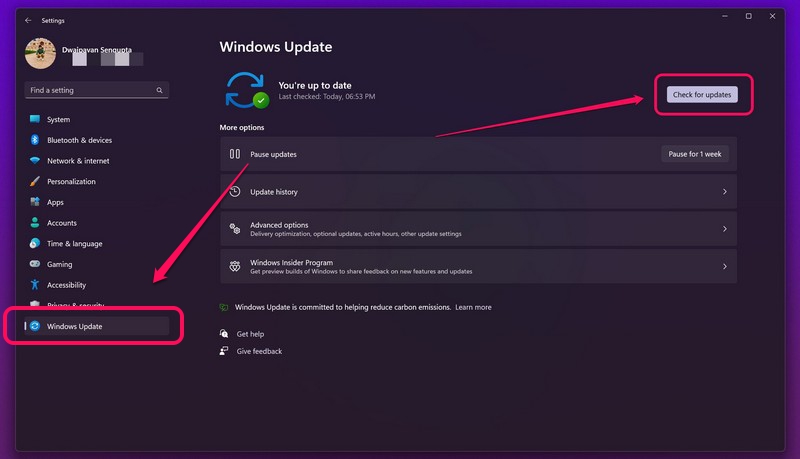
- Go to the Windows Update tab from the left pane and click the Check for updates button.
- If you have any latest Windows updates available, they will show up on this page.
- Once they show up, click the Download and install button.
- Now, wait for Windows 11 to finish the update and then restart your PC or laptop. After the Windows 11 OS has been updated on your device, the File Explorer application should start working again.
Why can’t I open File Explorer on my laptop?
There can be a number of reasons why File Explorer could stop working on your Windows 11 laptop. These include corrupted/ missing system files, misconfigured settings, or outdated Windows versions amongst others.
How to repair File Explorer not responding in Windows 11?
When the File Explorer application stops working in Windows 11, your options to fix it include restarting File Explorer and Windows Explorer, clearing File Explorer cache, updating your Windows 11 OS, and others (listed above).
How do I restart File Explorer in Windows 11?
To restart File explorer in Windows 11, open the Task Manager, right-click on the Windows Explorer option under the Apps section, and click on the Restart option.
Wrapping Up
So, this was all about the fixes that you can try when the File Explorer application stops working in Windows 11. Make sure you try out all the listed methods to fix File Explorer issues on your PC or laptop to get the system application up and running again. And if any of the above methods helped you fix your problem, let us know about it in the comments.
